Uploading a group set
If you are going to use the upload method to assign students / staff to groups (useful when you have a lot of students/ staff to assign), then it is highly recommended to create the group set (the process described here in this section) via the ‘Upload Group Set’ method too. This is despite the fact it only takes seconds to create a Group Set manually. This is because we have found that Blackboard struggles to match the groups and groups sets correctly unless they are both done by the upload method.
Please note that a group set is different from a group. Group sets are the upper level of which the groups are part of. So you may have e.g. a ‘Marking Group Set’ and within that you would have ‘Dave's Group’, Sue's Group’, etc.
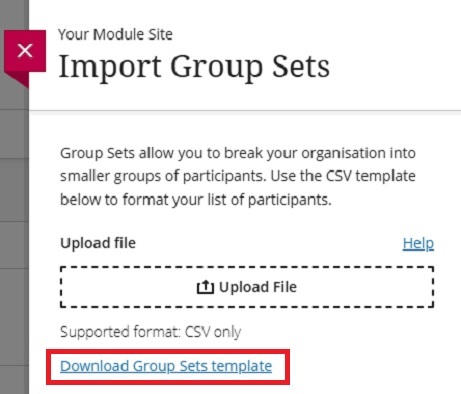
Step 1. Within a module or organisation site, select Groups on the top navigation bar.
Step 2. Select [Import Group Set], in the top-right corner.
Step 3. Download the Excel template by clicking on "Download Group Sets template".

Step 4. Complete the template. Below are descriptions of the data needed for each column.
|
Group Code
|
This column should really be called ‘Group name’. You create the group name. These are the names of the Groups you want to be in the Group Set. But the name cannot have spaces in, so use an underscore ( _ ) where spaces should be e.g. Level_4, Level_5, etc.
|
|
Title
|
The human-readable name for each Group ‘code’ in the Group Set. This can be the same as the code or with spaces instead of underscore e.g. Level 4.
|
|
Description (optional)
|
A description of the group
It is completely optional but might be useful to students if you are allowing them to self-enrol.
|
|
Group Set
|
The name of the Group Set, this should be the same for all Groups (as they are all going in the same Group Set. E.g. Groups by Year or Study Group Sets.
|
|
Self Enrol
|
Whether or not students can self enrol in the group. This will normally be N but put Y if you want them to be able to self enrol.
|
It should look something like this:

Step 5. Save the file you have just created and upload it on the same location as the previous step.
Step 6. You may find you need to click out of the group set, and click back in, to see the changes. Your groups should now be created.
Importing Group Members (via upload)
This method is useful for when you have large numbers of students.
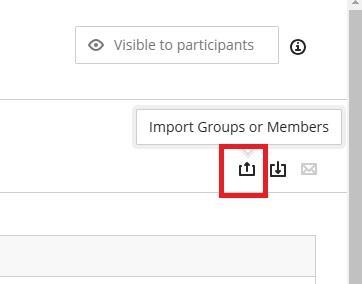
Step 1:Within a Group Set, click on the upload symbol in the top right-hand corner.

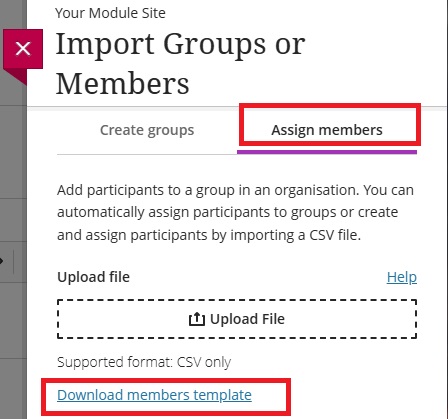
Step 2. Make sure "Assign Members" is selected across the top.
Then download the template by clicking "Download members template"

Step 3. Complete the template. The table below explains what information to put in each column. Most of this data can be obtained by downloading the grade centre export for the relevant module.
|
Group Code
|
This column should really be called ‘group name’. You create the group name. These are the names of the Groups you want to be in the Group Set. They should all be different. But the name cannot have spaces in, so use an underscore where spaces should be_ e.g. Paulas_study_group.
|
|
Username
|
The student's username. This is the version that begins with a letter. You can get this from the grade centre download.
|
|
Student ID
|
The student's ID. This is the version which begins with a number – this is optional so don’t worry if you don’t have it.
|
|
First Name
|
The student's first name You can get these from the grade centre download.
|
|
Last Name
|
The student's last name You can get these from the grade centre download.
|
|
Group Set
|
The name of the Group Set, this should be the same for all Groups (as they are all going in the same Group Set. E.g. Marking Group Sets or Study Group Sets.
|
It should look something like this:

Step 4. Save the file you have just created and upload it as the location as the previous step.

Step 5. Make sure to swap to the [Assign Members] tabs. Click [Upload file] and browse to the template you have just filed in and confirm the upload.
Step 6. You may find you need to click out of the group set, and click back in, to see the changes. Your groups should now be created.