Recording with Panopto for Windows
For an overview of the two different Panopto applications, please see this article: Choosing which Panopto tool.
Accessing Panopto for Windows
You can access Panopto for Windows via
- Most computers in SHU teaching spaces (double click the desktop icon)
- AppsAnywhere (more info about AppsAnywhere)
Before you start recording
Once you have loaded up Panopto for Windows, make sure to go through the basic settings below:
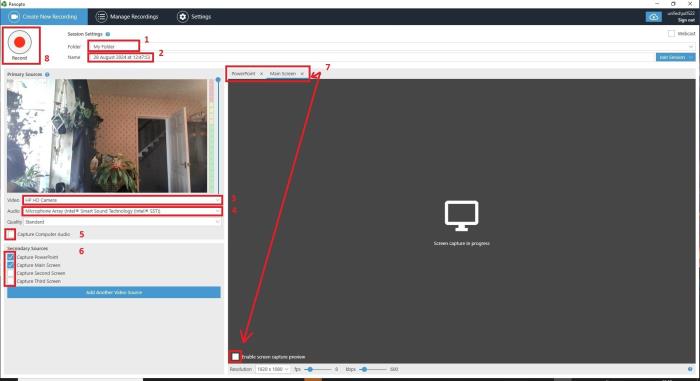
- This is the folder that the recording will be saved to – drop this down to change the location
- This is the default name of the recording – you are advised to rename the recording to make it easily identifiable.
- This displays the selected camera. Drop down to select a different camera or to turn off your camera.
- This is the selected microphone. It should select your default microphone, but please do check.
- This enables the recording of sound from sources other than your microphone – please make sure to tick this box if you are playing e.g. videos or PowerPoints with audio that you want to capture.
- These settings allow for the capturing of another source, such as screens, etc. By default, only your camera is captured. Please make sure to select appropriately here if you want to record your screen, PowerPoint etc.
- This area displays the other video sources you are recording, as selected at point 6. Check the [Enable screen capture preview] box at the bottom of the screen to see what is being captured.
To start recording
Step 1. Click the [Record] button (bullet point number 8 in the above image) to start recording.
Step 2. While recording, you should demonstrate the tasks/learning you want to capture.
Step 3. When the [Record] button is active, it turns to a [Stop] button, and a [Pause] button appears to the right of it.
Step 4. Pressing the [Pause] button effectively pauses the recordings (Panopto is actually still capturing video and audio but will remove any audio or video captured from the final recording). Select [Pause] again to restart recording.
Step 5. Pressing the [Stop] button will end the recording, and you will be given the option to select either [Done] or delete the recording and start again.
Step 6. You will be taken to the Manage Recordings tab if you select to [Done]. After the upload has been completed, you will see the option to [Edit] in the Status / Link section.
Step 7. Selecting [Edit] will take you to the editing panel.
More information on how to edit Panopto Recordings can be found in the editing section.