A Rubric can be used to display the assessment criteria for an assignment, helping students understand what is expected to meet the requirements of an assignment. Rubrics can also be used by instructors as a marking and feedback tool to demonstrate to students how they met each criterion. Rubrics can ensure that marking is consistent and impartial, and provides transparency into the grading process. Rubrics are typically added to Assignments, but can also be used with Discussions and Journals. They cannot be used with Tests or regular grade columns.
Rubrics consist of rows and columns. The rows correspond to the criteria. The columns correspond to the level of achievement that describes each criterion. When a new rubric is created, it will consist of four rows and four columns, but you can add additional rows and columns as required. Rubrics can be copied and re-used in the same Blackboard site or copied between Blackboard sites.
This article explains the process for creating, copying, adding, and removing rubrics from assignment submission points. To learn how to mark student work using a rubric, please see Marking Student Submissions.
No points rubric
We recommend the use of no points rubrics. This is a rubric that does not automatically assign and calculate a numerical grade on the criteria selected during grading. This enables greater flexibility on your judgement for awarding a mark for student work against a categorical grade, rather than a calculated-type rubric that may calculate a final mark that does not align with a categorical grade or your overall judgement of the work.
Blackboard have now introduced a new true non-scoring no points type rubric. If you have previously set up a points-based rubric with a value of zero assigned to each criterion to mimic a no points rubric, you can switch to the new no points rubric if you haven’t started grading with the existing rubric.
How to create a rubric
Step 1. Go to Gradebook on your module site and select the Settings cog in the top-right.
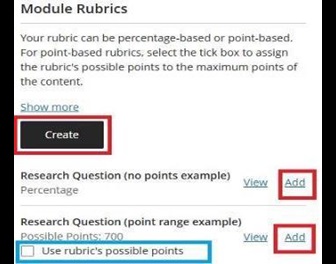
Step 2. Scroll down through the Settings to Module Rubrics and select Create. (You will also see a list of any existing rubrics, and you can optionally make a duplicate copy an existing rubric as a basis for a new rubric).
Step 3. Name the rubric. If you have multiple rubrics in the site, make sure that they have distinguishable names.
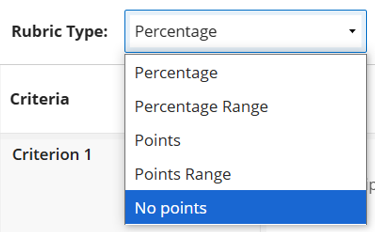
Step 4. In the Rubric Type field, you can select either: Percentage, Percentage Range, Points, Points Range, or No points. We recommend using the No points rubric.

Step 5. You can now start to add/edit content within your rubric.
Step 6.
To add a row or column you can use the purple plus symbol where you want to add it (either between existing rows or columns, or before the first or after the last row or column). The plus symbols are located next to the titles in either the rows or columns.

To edit the content in a cell, select the pencil icon, this will allow you to edit the text inside the cell (and set the value you want to award for meeting that criterion if using a points or percentage type rubric).

To delete a row/column, select the delete icon next to the pencil.

Step 7. Save the rubric.
How to copy a rubric onto your site
Copying a rubric follows the same process as copying any items between Ultra sites or from a classic to an Ultra site.
How to add a rubric to an assignment submission point
Once you have created or copied a rubric onto the site, you need to add it to an assignment submission point for students to view it and to use it for grading.
Step 1. Go to the assignment submission point (usually in the module site assessment folder). Click to open or edit the assignment.
Step 2. Click the Settings cog to open the Assessment Settings panel.

Step 3. Scroll down to the Settings Panel until you see Additional Tools. Click Add marking rubric under Use marking rubric.

Step 4. Available rubrics will be listed:

- Click View to check you will select the correct rubric.
- Click Create if you need to create a new rubric.
- Click Add to add the rubric with the submission point.
If you have created a points-based rubric, you will additional see an option to select Use rubric’s possible points check box. Selecting this option will override the Maximum Points assigned to the assignment, with the total points possible for the rubric
Step 5. Click Save. You have now added a rubric to the submission point.
How to remove a rubric from a submission point
Step 1. Go to the assignment submission point (usually in the module site assessment folder). Click to open or edit the assignment.
Step 2. Click the Settings cog to open the Assessment Settings panel.
Step 3. Scroll down to the Settings Panel until you see Additional Tools.
Step 4. Hover over the rubric, and a trash can icon will appear. Click the trash can to remove the association between the rubric and the assignment submission point.

Get Support