Related Links
Panopto Interface
This guide is intended to provide a quick overview of the Panopto interface.
There are two different versions of Panopto.
- Panopto For Windows (or Mac). This is the version installed on most computers in teaching spaces within SHU. You can also access it via AppsAnywhere.
- Panopto Capture is a browser-based version that can be used on most internet-connected devices but has some limitations. You can access it via your Panopto account (go [Create] > [Panopto Capture]) and your Blackboard sites (via [+] > [Integrated Tools] > [Panopto Video Embed] > [Record]) > [Capture (browser)]
Please see this section for a more detailed guide on Recording in Panopto and the difference between the two versions.
Panopto For Windows
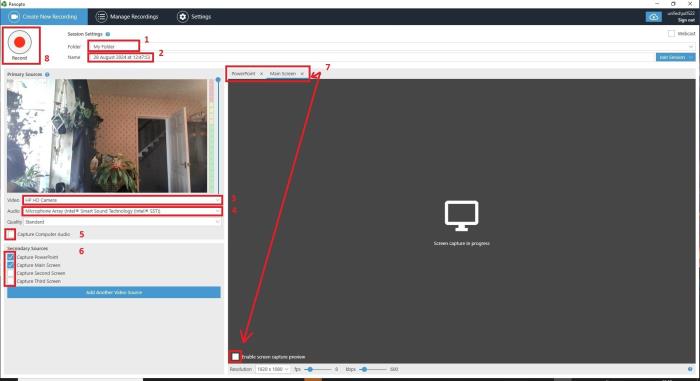
- This is the folder that the recording will be saved to – drop this down to change the location
- This is the default name of the recording – you are advised to rename the recording to make it easily identifiable.
- This displays the selected camera. Drop down to select a different camera, or to turn off your camera.
- This is the selected microphone. It should select your default microphone, but please do check.
- This enables the recording of sound from sources other than your microphone – please make sure to tick this box if you are playing e.g. videos or PowerPoints with audio that you want to capture.
- These settings allow for the capturing of another source, such as screens, etc. By default, only your camera is captured. Please make sure to select appropriately here if you want to record your screen, PowerPoint, etc.
- This area displays the other video sources you are recording, as selected at point 5. Check the [Enable screen capture preview] box at the bottom of the screen to see what is being captured.
- Click this button to start recording. Whilst you are recording, this button becomes a stop/pause button.
Once you stop recording click [Done] then [Edit] to be taken to the editing panel to add titles, splice several recordings, add presentations, etc.
Panopto Capture
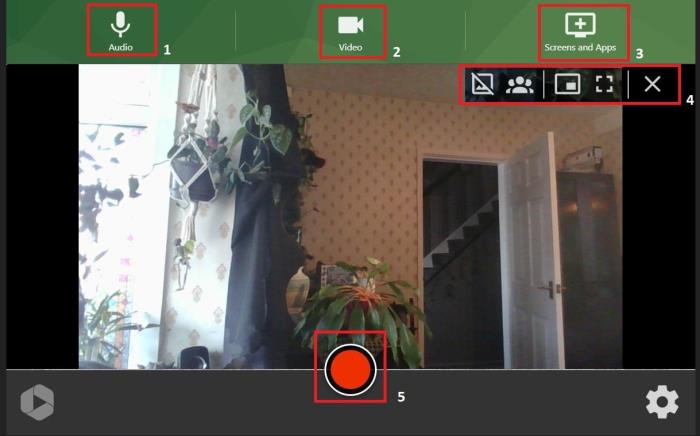
- This is your audio settings – please check that you have selected the correct microphone.
- This is your camera settings. If you have multiple cameras attached to your device, you can select between them here.
- Here you can select between various screens and apps to share in your recording and the different combinations of views.
- These are your Background, Face tracking, Picture in Picture, and Full Screen settings. Hover over this area to see these settings.
- Press the record button to start recording. While you are recording, this becomes the stop button. You cannot pause recordings in Panopto Capture; only stop recording.
Once you have pressed ‘Stop' in Panopto Capture you will see the below screen.
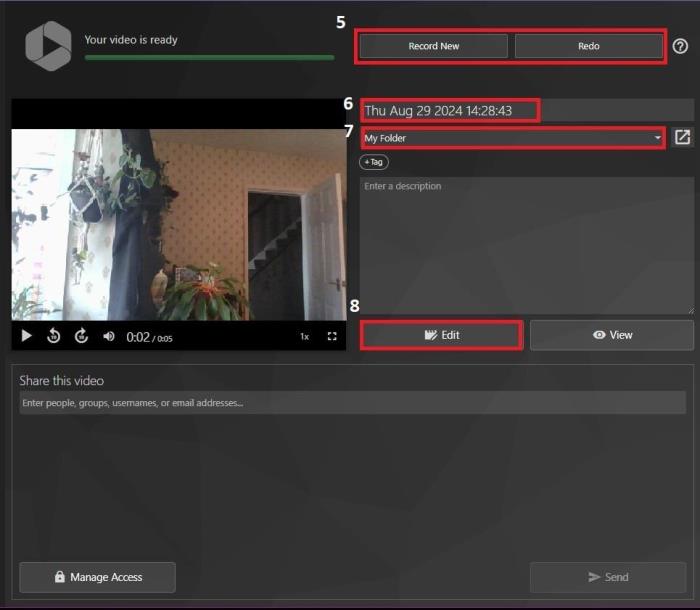
5. Here, you can start a new recording or delete and redo the last recording.
6. This is the default name of the recording. You are advised to rename the recording to something easier to identify.
7. This is the current location of the recording. Drop down the menu to change the location.
8. Here, you open the editing panel to add titles, splice several recordings, add presentations, etc.